Showing posts with label tutorial. Show all posts

Wednesday, January 30, 2013

Nail Foil Tutorial - How to apply nail foil on curvy nails

Hello everyone! ^^
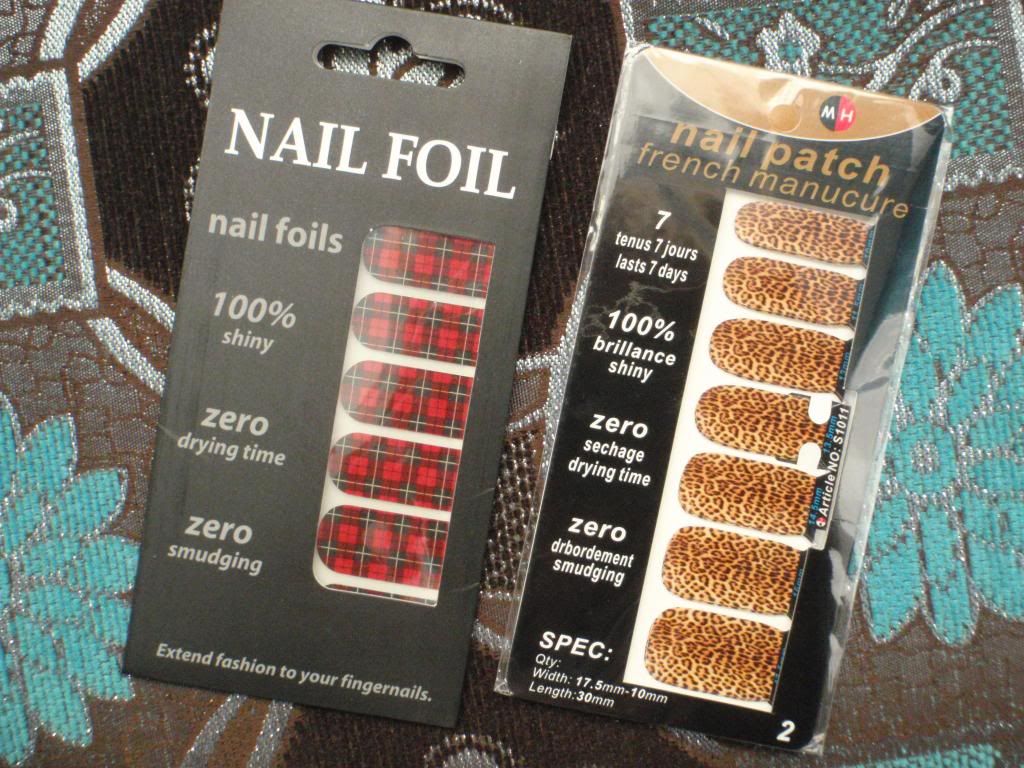
I've always been very curious about nail foils and nail polish strips, but also quite precautious about whether they would work for me or not, since my nails are so curvy. :P I mean, I love the idea of an easy way to create complicated designs, but I've always had trouble to make even slightly larger than usual stickers to settle nicely on my nails, so what would happen with stickers that cover my entire nail? Because I wasn't sure I would like the result, I just kept to regular nail polish. However, couple weeks ago I was contacted by OMG Nail Strips, asking if I would be interested in trying free samples of their nail polish strips or nail foils. Of course I was interested! :D Finally a chance to find out what these things are all about. :)


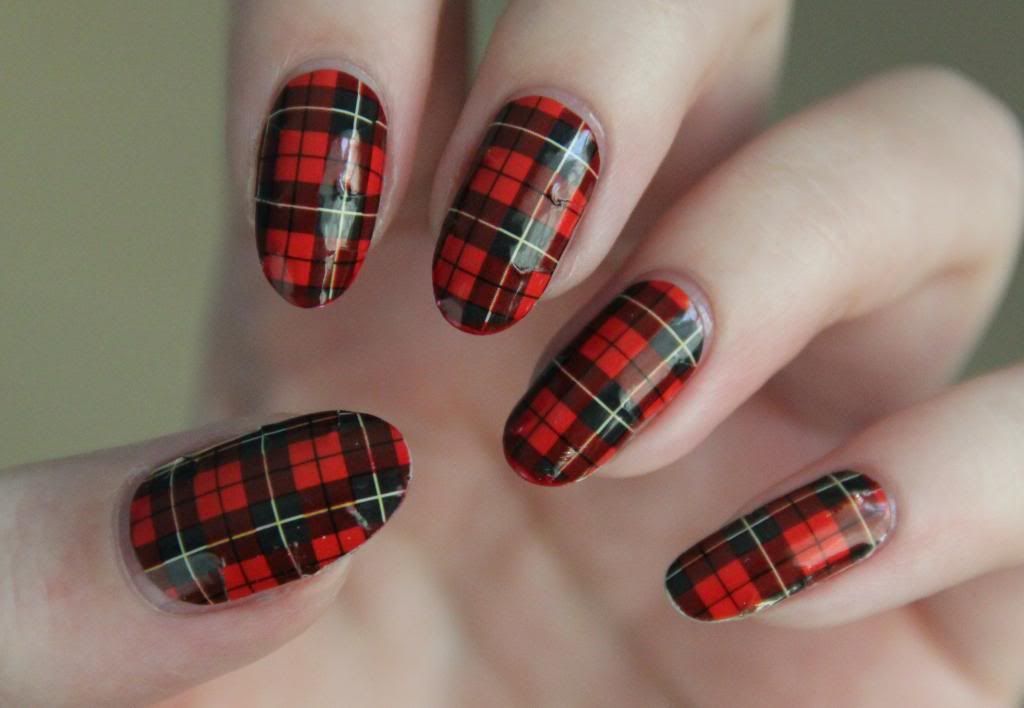
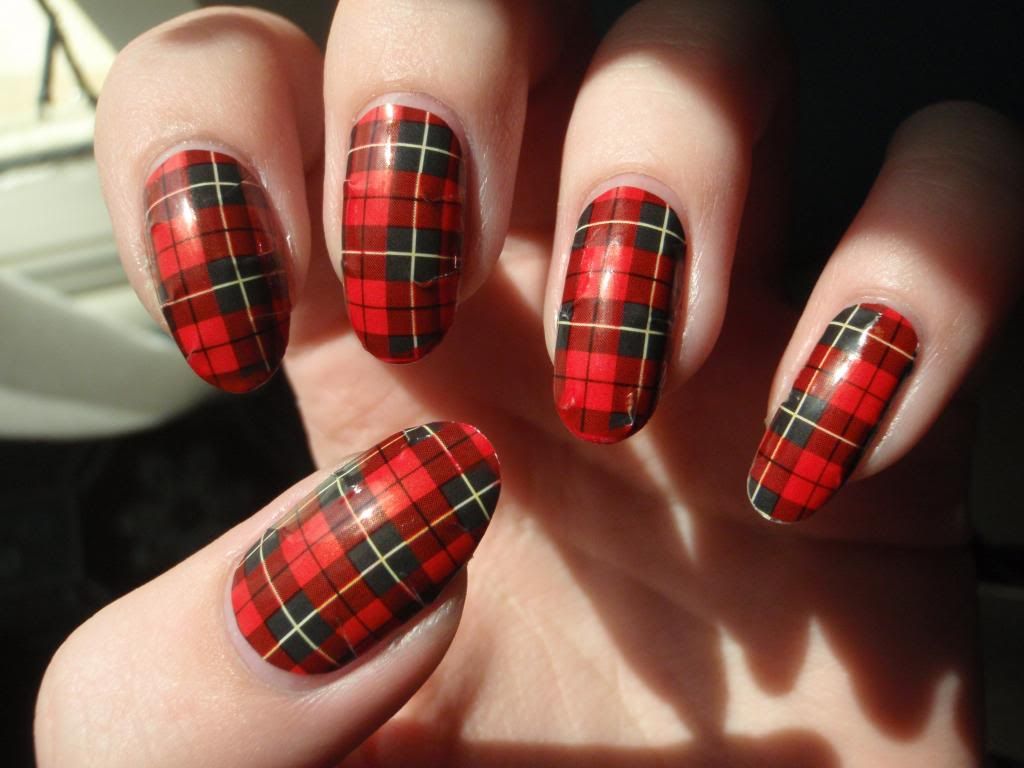
First I wanted to try the nail foils, and this is how they turned out. :) As you can see I also changed my nail shape! I've always liked my nails square, but now I wanted something different. I've had round nails once before, but I didn't really like them... Probably because I didn't make them round enough and they were too long. :P Anyway, this time I really like them!
Now for the tutorial:


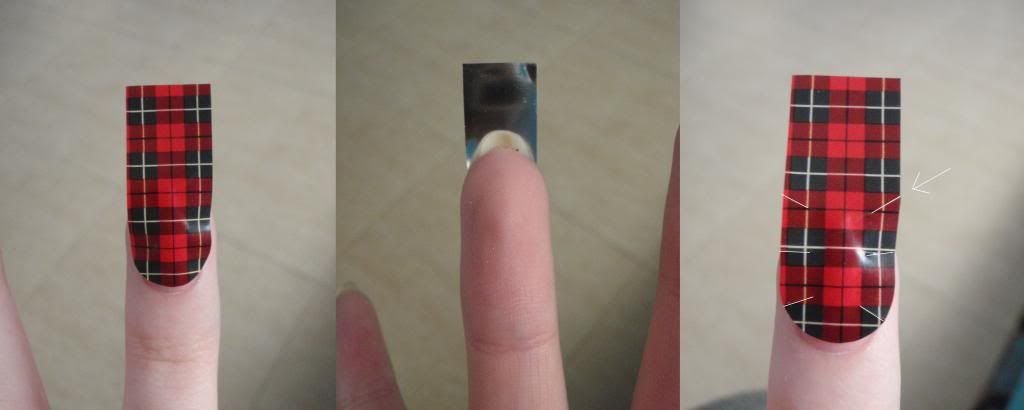
1. Pick the right size. Do not use base coat, the nail foils should be applied on clean nails!
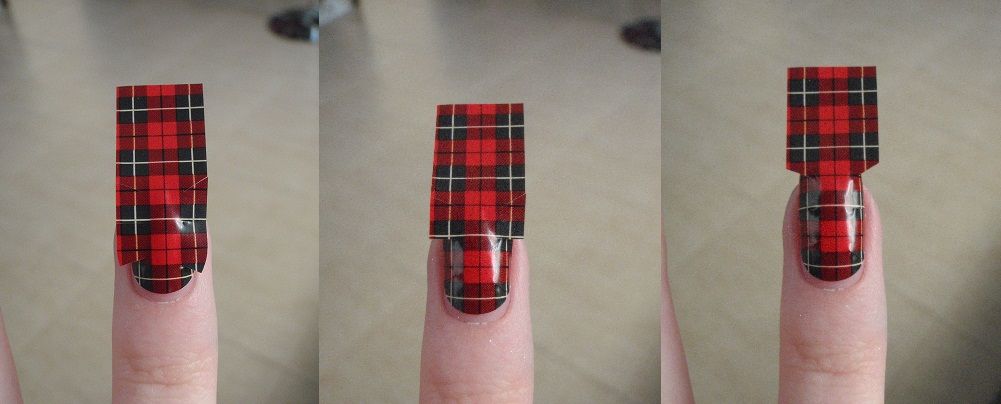
2. You don't have to shorten it yet, just make sure the foil is wide enough to cover your whole nail.
3. I had some trouble making the foil stick to my nail smoothly without bumps or wrinkles, so I came up with my own method of applying them. Cut the foil from edges towards the center as shown in the picture, depending on the length of your nails.


4.-6. Start pressing the tears on the nail surface from bottom to top, as shown in the picture. Rub them firmly to make them stick smoothly.


7. Rub the last bit firmly on the tip of your nail. It should look like this at this point. ^


8. Cut the excess foil from the tip.
9. File the edge to make it smooth, and add top coat. The top coat isn't necessary, but I found it made my nails smoother and made the edges stick better.


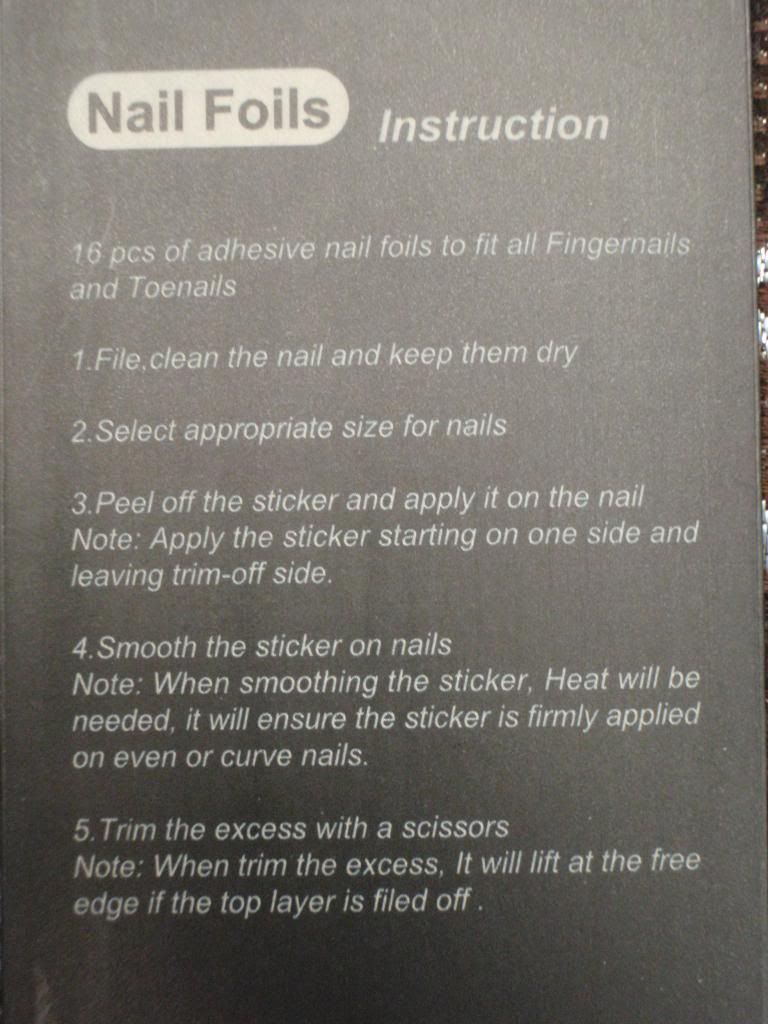
And you are done! As I expected, I struggled to apply the foils smoothly, but after I came up with the solution I'm quite happy with the result. :) One thing I didn't quite understand though, was the bit in the instructions that said 'heat will be needed'. How was I supposed to apply heat? :'D The nail foil design I chose is Red Plaid, although it was a difficult choice... Click the link for more details of the product!
Next up, the nail polish strips! ^^

Tuesday, April 19, 2011

Tutorial: How to fix nail-damages with tea bag-paper?

I hit my middle finger straight to the wall while ago and it cracked, so I decided to do a tutorial about how to fix it. First I want to say that this is not any kind of professional way to fix nail damages, this is just something I do because I don't have the nail wraps that are officially used for this type of fixing... I guess they're called silk wraps, but I'm not sure. I use tea bag-paper instead. Yeah. It actually works! It's just takes a while to wait for the glue to dry... Anyway, here's my tutorial, I hope it's helpful!

Ugh, that looks bad... 
 Yup. I have no idea how it got that bad... :P But luckily it's easily fixed! Here's what you'll need: tea bag-paper, tweezers, wooden stick, nail glue, metallic file, glass file and buffer/smoother.


Cut a piece of tea bag that covers the damages.


Next put a drop of nail glue on your nail, on the damaged area.


Smudge the edges of the glue drop with your finger.
Smudging will make the filing easier later and makes the glue dry faster. Next put the piece of tea bag into the glue, on the damages. The tea bag should become transparent. Remember to make sure that all the damages are covered!


Wait for the glue to dry entirely. This may take a lot of time, it depends on glue and how much glue you have on the nail. You have to wait long enough, because next you have to file the nail and it will be difficult if the glue is still sticky... ;)
File the nail so that the surface becomes smooth. Use metallic file. You have to file on top of the tea bag and glue, but be careful that you won't file your the surface of your own nail!


Add another layer of tea bag. The piece doesn't have to be the same shape as the first one, actually it would be good if it was little smaller or bigger.
Put another drop of nail glue on the damaged area and poke the tea bag into glue. You can use wooden stick to make sure that the piece will be entirely covered in glue and that there won't be any air bubbles!


Wait again for the glue to dry entirely and file with the metallic file. Then smooth the nail surface with the buffer and after that buff the nail surface.


Add some more glue (just a little bit) and smudge it quickly on your nail with your finger. I use the glass file to file the edges. If there's any bumps remaining, smooth them out. And we're ready! ^^

Don't forget the lotion... 
I hope this tutorial was clear enough! ^^ What do you think, was it helpful? :)

Toivon että kuvat on sen verran selkeitä ettei noita ohjeita tarvitse kääntää, kommentoikaa jos jäi jotain kysymyksiä! :)

PS. I´m sorry that I´ve been updating little slowly lately, but I have a good reason... I´ve moved to the United Arab Emirates! :D My family has already been living here since last summer, and I'm very happy to be here at last! It's so warm and sunny... ^^I´ve already done some nails and shopping, so I have lots of stuff to blog about, so don't worry, I´m going to continue blogging normally! :)


PS. Viime aikoina olen päivitellyt aika hitaasti, mutta minulla on siihen hyvä syy... olen muuttanut Arabiemiraatteihin perheeni luokse! He ovat asuneet täällä jo viime kesästä lähtien, ja on tosi kiva viimeinkin olla täällä! ^^ Blogi ei kuitenkaan ole jäämässä tauolle tai mitään, minulla on jo uusia kynsiä ja shoppailuja esiteltävänä... ;)

Saturday, December 25, 2010

Fimo tutorial part 5 - Donut!

First of all, Merry Christmas everyone!! :D Here´s my fifth fimo-clay tutorial, Donut! Consider it as a christmas-gift... ;)


Okay! And this was the last fimo-tutorial, I hope they´ve been useful for you and you´ve enjoyed modelling. ^^ Of course there´s always a possibility that I´ll do more of these tutorials in the future... ;)
Also I have something to tell you: I´m currently on holiday at the United Arab-Emirates! I´m visiting my family, they live here in Al-Ain, so I´m taking a little break with blogging for now. Don´t worry, I´ll be back soon, so don´t go anywhere. ;) And when I come back, I´ll have lots of stuff to blog about! Nails and shoppings and christmas gifts... ^^
But for now, see you probably next year, enjoy your holidays and have relaxing christmas! <3

Saturday, December 18, 2010

Fimo tutorial part 4 - Candy cane!

I know I said that the next tutorial would be donut, but that has to wait now because christmas is coming! So here we go, candy cane tutorial for christmas! :D
Candy canes are probably the easiest to make, so I suppose I should have done this as the very first of the tutorials, but now it´s more current. :) First I thought to leave texts out because you don´t really need them, I think you see everything important by just looking the pictures. But I did them anyway, maybe they´re useful.


Okay. I hope it´s useful! ^^ Next time I´ll do the donut-tutorial! :)

Wednesday, November 24, 2010

Fimo tutorial part 3 - Bow!

Now it´s time for a new fimo-clay tutorial. :) As I promised, it´s bow!


I hope there´s no huge grammar mistakes or anything, I was quite tired while editing the pictures... =_= But yeah, here they are, and if you have any questions you can always ask! ^_^
And remember, again, that if you´re doing bows for your nails, make sure they are tiny enough and shaped properly (like here)!
Next up in fimo tutorials is a DONUT! ;9

Saturday, November 13, 2010

Fimo tutorial part 2 - Cookies!

Here´s the tutorial for fimo-cookies. This time there´s more pics and less text, click the pics to make them bigger!


If you want to do cookies for nails, remember to make them tiny enough to fit on your nails, and if you have curved nails, you have to make sure that the cookie is shaped properly so it won´t stick out too much!

Like this :)
That´s it this time! Next in the fimo tutorials is... Bow! I´m going to Helsinki tomorrow, but I´ll do it as soon as I can. Ask if you have any questions about cookie-tutorial, and let me know if you have any wishes for the next tutorial! ^_^
PS. 61 followers already! Thank you so much everyone! I´m glad you find my blog interesting enough to read! <3

Wednesday, November 10, 2010

Fimo tutorial part 1 - Chocolate bar!

Finally, here it is! The fimo tutorial! And we are starting with... Chocolate bar! :9 White chocolate, technically, but chocolate any way. So here´s what we´re going for:

I´m sorry that for the lighting of these pics, I didn´t have sun light while taking these pictures. :(
( The colours of different chocolate bars are slightly different due to lighting, I´m sorry! Please don´t let it bother you.) You can click the pic to make it bigger! :)
 Okay. I hope the picture is helpful! Here´s more detailed instructions:

Step 1. White chocolate isn´t actually pure white, it´s little yellowish. So if you don´t have the right colour of fimo-clay, you have to do it yourself! Take a lump of white fimo-clay ( the size doesn´t matter, it depends on what size you want your chocolate bar to be. The one I made is about 1,5 cm x 2 cm.) and a smaller slice of yellow fimo-clay. Mix them thorough together to get the colour right. ( of course you can make milk- or dark chocolate also, I just made white chocolate!)

Step 2. Shape the piece of clay to form approximately a thick square plate.

Step 3. Share the square to form the pieces of chocolate. Use small knife and remember to make the edges oblique ( look at the picture). It makes the chocolate look more realistic than if you just "draw" couple of lines with a knife.

Step 4. Flatten the edges of chocolate bar. Press the edges with the flat of the knife, and remember to bevel the edges again (look at the picture)!

Step 5. Cut off the extra clay from the edges to make the shape fitted.

Step 6. If you want to, you can add some text on the chunks of your chocolate bar to make it more detailed. I wrote `MILK` with a pin.
Note: If you want to do earrings ( for example) you have to remember that fimo-clay hardens in oven, so you have to do all holes and stuff like that before baking! And if you´re going to use this chocolate as nail accessory, you have to make sure it´s right shaped and thin enough, otherwise it´s going to be really annoying to have a huge chunk of chocolate on your nail to stick on your hair and clothes...

And we´re ready! Now you have to "bake" your chocolate to make it harden. Put it in oven for 30 minutes and 110 degrees (celcius).

That´s it. I hope this was a useful tutorial, please tell me your opinion and let me know if I can do anything better for my next fimo-tutorial, which btw is going to be Cookies! And if you have questions about chocolate bar, tell me! ^_^